
More than 30 percent of American athletes report wrist pain after intense training or repetitive activities. Whether your symptoms started on the tennis courts in Austin or after hours at a local tech job, finding real relief can feel frustrating. With so many options for bracing and recovery, knowing exactly how to choose, fit, and use a wrist brace is the first step toward getting back to pain-free movement and protecting your wrist for future performance.
Table of Contents
- Step 1: Choose the Right Wrist Brace for Your Condition
- Step 2: Prepare Your Wrist and Inspect the Brace
- Step 3: Fit the Brace Securely to Your Wrist
- Step 4: Adjust Straps for Optimal Support and Comfort
- Step 5: Check Mobility and Comfort During Daily Activities
- Step 6: Monitor Progress and Consult Your Healthcare Provider
Quick Summary
| Main Insight | Detailed Explanation |
|---|---|
| 1. Choose the right brace for your condition | Understand your specific wrist injury to select a brace that will support your recovery effectively. |
| 2. Prepare and inspect the wrist and brace | Examine both your wrist condition and the brace for any issues before applying for optimal support. |
| 3. Fit the brace securely and comfortably | Ensure the brace fits snugly without restricting blood flow, providing comfort and stabilization. |
| 4. Monitor performance in daily activities | Regularly assess how the brace impacts your movements and comfort during everyday tasks. |
| 5. Track recovery and consult your healthcare provider | Keep a detailed log of symptoms and progress to discuss with your specialist for ongoing care adjustments. |
Step 1: Choose the Right Wrist Brace for Your Condition
Selecting the appropriate wrist brace requires understanding your specific injury and performance needs. Not all wrist braces are created equal, and choosing the wrong support can potentially worsen your condition or limit recovery effectiveness.
Your initial selection depends on identifying the underlying issue. Wrist injuries range dramatically from carpal tunnel syndrome to sprains, fractures, and tendonitis. Each condition demands a unique bracing approach. For instance, a compression brace works differently for arthritis compared to a rigid immobilization brace needed after a fracture. Focus on braces that provide targeted support matching your specific diagnosis.
Consider your activity level and mobility requirements when selecting a wrist brace. Keeping wrists in a neutral position reduces strain and promotes proper healing. Look for braces that allow some controlled movement while providing stable support. Adjustable models with breathable materials work best for athletes and active individuals recovering from minor injuries.
Here’s a comparison of common wrist brace types and their ideal uses:
| Brace Type | Best For | Typical Features |
|---|---|---|
| Compression Sleeve | Arthritis, tendonitis | Flexible, light, increases circulation |
| Rigid Immobilizer | Fractures, severe sprains | Hard shell, minimal movement |
| Adjustable Sport Brace | Minor strains, active use | Customizable fit, breathable material |
| Splint with Thumb Support | Carpal tunnel syndrome | Extra thumb stability, limits flexion |
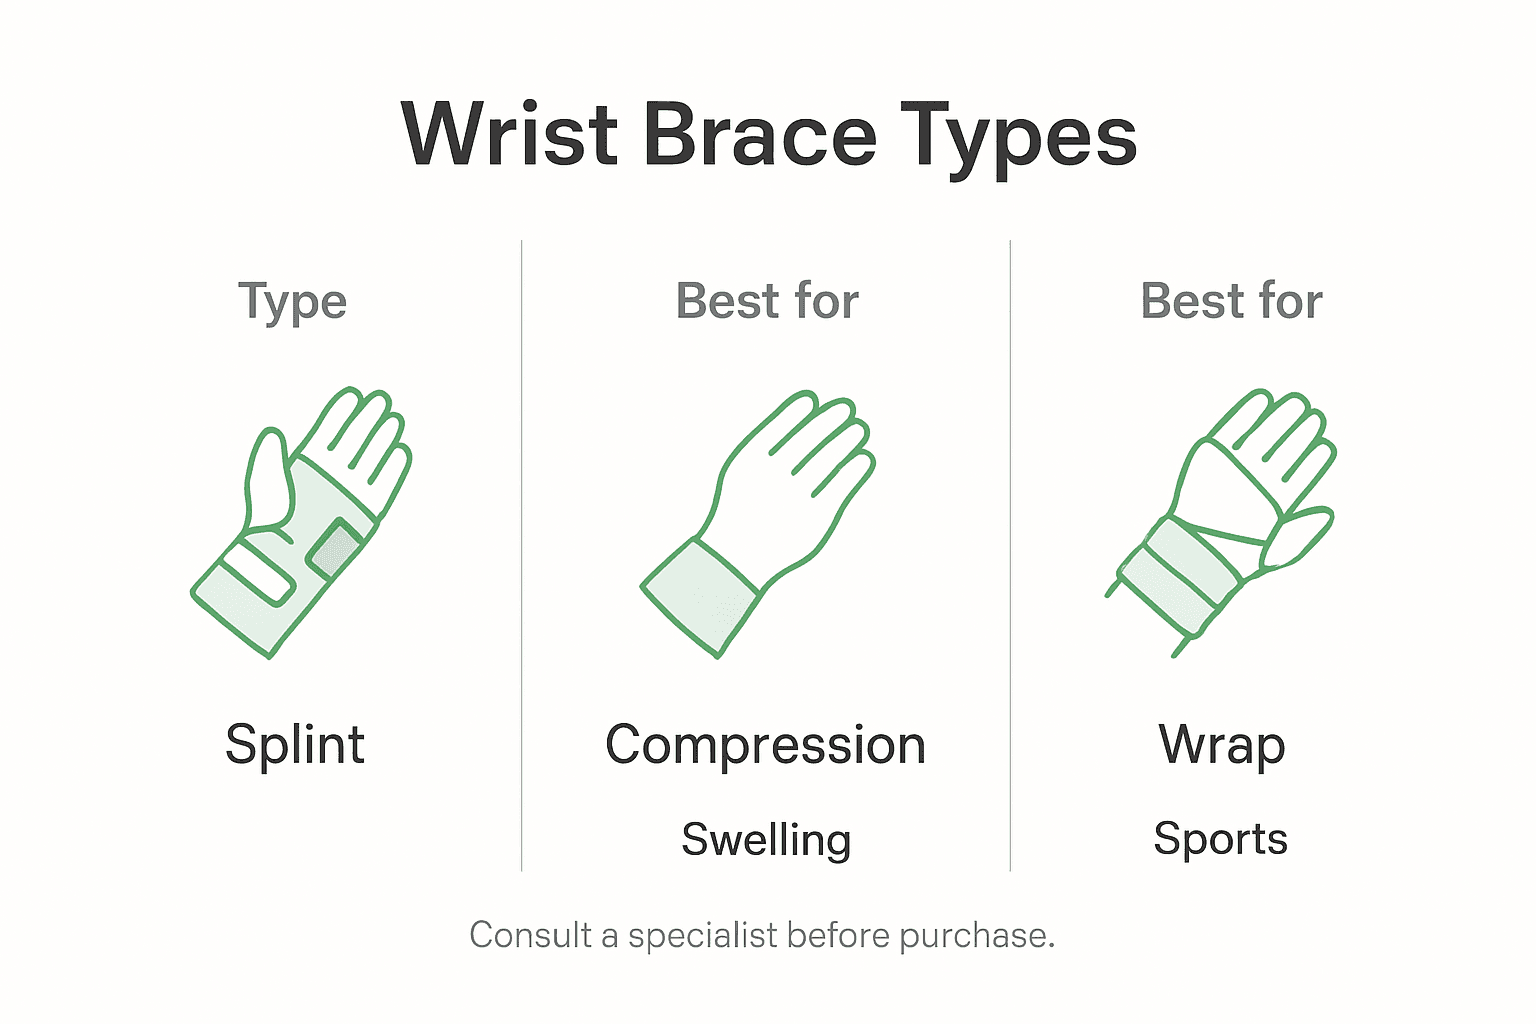
Pro Tip: Consult with a hand specialist before purchasing a wrist brace to ensure you select the most appropriate design for your specific condition and recovery goals.
Step 2: Prepare Your Wrist and Inspect the Brace
Preparing your wrist and properly inspecting your brace are crucial steps in ensuring effective pain relief and preventing further injury. This process involves careful examination of both your wrist condition and the brace itself before application.

Preparing for brace application requires thorough inspection of both the device and your wrist. Start by thoroughly examining the brace for any signs of wear, tear, or damage that could compromise its supportive function. Check all straps, fasteners, and material integrity to ensure they will provide stable support. For your wrist, assess the current condition carefully look for swelling, discoloration, or areas of significant pain.
When applying the brace, stabilize the injured area carefully and check circulation to prevent additional complications. Ensure the brace extends slightly beyond the injured area to provide comprehensive support for surrounding joints. Position your wrist in a comfortable neutral position, avoiding extreme angles that might cause additional strain. Apply the brace snugly but not so tight that it restricts blood flow, watching for signs of numbness or skin discoloration.
Pro Tip: Always consult with a hand specialist to confirm your brace fitting technique and ensure you are supporting your specific injury correctly.
Step 3: Fit the Brace Securely to Your Wrist
Fitting a wrist brace correctly is critical for effective pain relief and proper injury support. Your goal is to achieve a secure yet comfortable fit that provides optimal stabilization without restricting circulation or causing additional discomfort.
Begin by positioning your wrist in a neutral alignment, ensuring the brace covers the appropriate anatomical regions. Understanding wrist anatomy basics helps you recognize the precise areas requiring support. Align the brace so it extends slightly beyond the joint, covering the lower forearm and upper hand regions. Adjust the straps systematically starting from the bottom and working upward, creating an even tension that feels snug but not restrictive.
Check the brace fit by performing gentle range of motion tests. Verify you can move your fingers freely and that the brace maintains a consistent position without sliding. Pay close attention to potential pressure points or areas of potential skin irritation. The brace should feel like a supportive extension of your arm an integral part of your recovery strategy that allows controlled movement while protecting the injured area.
Pro Tip: Test your brace fit by checking skin color and sensation every hour to ensure proper circulation and prevent potential complications.
Step 4: Adjust Straps for Optimal Support and Comfort
Adjusting your wrist brace straps requires precision and careful attention to ensure maximum therapeutic benefit while maintaining comfort. Your goal is to create a supportive environment that promotes healing without causing additional strain or circulation issues.
Start by positioning the primary support strap closest to your wrist joint first. Understanding wrist anatomy basics helps you recognize the critical zones requiring targeted stabilization. Tighten this initial strap until it feels secure but allows a finger to slide underneath comfortably. Subsequent straps should be adjusted progressively moving from the wrist outward towards your hand and forearm. Each strap requires a balanced tension not too loose that it fails to provide support and not so tight that it restricts blood flow or causes discomfort.
Perform a mobility check after each strap adjustment. Rotate your wrist gently and flex your fingers to ensure the brace moves harmoniously with your natural movements. Look for any areas of pinching or uneven pressure that might indicate improper fitting. The ideal brace feels like a natural extension of your arm providing consistent support without feeling restrictive or causing skin irritation.
Pro Tip: Apply the brace in front of a mirror to visually confirm symmetrical strap placement and adjust incrementally for the most comfortable fit.
Step 5: Check Mobility and Comfort During Daily Activities
Assessing your wrist brace performance during everyday tasks is crucial to ensuring it provides optimal support without compromising your functionality. Your goal is to maintain pain relief while preserving natural movement and preventing additional strain.
Monitoring how the brace affects your daily activities requires systematic observation and proactive adjustment. Start by performing typical tasks like typing, writing, cooking, or driving to evaluate how the brace impacts your range of motion. Pay attention to any discomfort, pinching, or limitations that might signal an improper fit. Some restriction is expected, but the brace should not prevent you from completing essential movements or cause additional pain.
Conduct periodic mobility checks throughout the day. Flex your fingers, rotate your wrist gently, and assess whether the brace feels like a supportive ally or an uncomfortable hindrance. Wrist braces are most effective when worn during activities that typically aggravate pain such as repetitive hand movements or extended computer work. If you notice persistent discomfort or significant mobility restrictions, consider consulting your healthcare provider about potential brace modifications or alternative support strategies.
Pro Tip: Keep a daily log of your brace performance to track comfort levels and discuss specific concerns with your orthopedic specialist.
Step 6: Monitor Progress and Consult Your Healthcare Provider
Tracking your wrist recovery requires systematic observation and proactive communication with your healthcare team. Your primary goal is to document changes in pain levels, mobility, and overall function to support an effective treatment strategy.
Regularly monitor your symptoms and wrist function while using the brace. Pay close attention to key indicators such as pain intensity, swelling reduction, range of motion improvements, and your ability to perform daily tasks. Document these observations in a detailed log that includes dates, specific activities, and any discomfort experienced. Look for gradual improvements in your symptoms or note any persistent issues that might require professional intervention.
The table below summarizes key wrist brace monitoring indicators:
| Indicator | What to Track | When to Notify Provider |
|---|---|---|
| Pain Level | Increasing or decreasing | Persistent or worsening pain |
| Swelling | Size, color changes | New or severe swelling |
| Mobility | Range of motion progress | Loss of movement over time |
| Skin Condition | Numbness, discoloration | Sudden change or irritation |
Healthcare providers can leverage remote patient monitoring to assess your wrist recovery progress. Schedule regular check-ins with your orthopedic specialist to review your documented observations. During these consultations, be prepared to discuss your brace usage, pain levels, and any challenges you have encountered. Your specialist might recommend adjustments to your treatment plan, suggest alternative therapies like PRP treatment, or provide additional guidance to support your recovery.
Pro Tip: Create a digital or physical journal that tracks your daily wrist brace experience to provide your healthcare provider with comprehensive recovery insights.
Take Control of Wrist Pain with Expert Orthopedic Care
If managing wrist pain and choosing the right brace feels overwhelming, you are not alone. Many struggle with selecting the proper support or fitting their brace correctly, which can delay healing and increase discomfort. This guide highlights the importance of personalized wrist brace use for conditions like tendonitis, fractures, and carpal tunnel syndrome. At Hand To Shoulder Austin, we understand how critical proper support and expert treatment are to your recovery journey.

Discover compassionate care from a fellowship-trained surgeon who focuses exclusively on upper extremity conditions. Explore our Wrist Injury & Treatment Guides | Austin Orthopedic Blog to learn more about effective therapies and pain management strategies. When you are ready, take the next step toward healing by scheduling a consultation at Hand To Shoulder Austin. Personalized, professional support is just a click away to help restore your wrist function and relieve pain safely.
Frequently Asked Questions
How do I choose the right wrist brace for my condition?
Choosing the right wrist brace involves identifying your specific injury and performance needs. Focus on braces that provide targeted support matching your diagnosis, such as using a compression sleeve for arthritis or a rigid immobilizer for fractures.
How do I properly inspect my wrist brace before using it?
Before applying your wrist brace, examine it for any signs of wear, tear, or damage that could affect its function. Check all straps and fasteners to ensure they are intact, and assess your wrist for any swelling or pain before putting on the brace.
What is the best way to fit my wrist brace securely?
To fit your wrist brace securely, start by positioning your wrist in a neutral alignment and adjusting the straps starting from the bottom. Ensure the brace covers the appropriate areas and feels snug but not restrictive, allowing for gentle finger movement if needed.
How can I adjust the straps for optimal support and comfort?
Adjust the primary support strap closest to your wrist joint first, ensuring it’s secure but not too tight. Proceed to tighten subsequent straps evenly, performing mobility checks after each adjustment to confirm that the brace stays in place without causing discomfort.
How do I monitor my brace’s performance during daily activities?
To monitor your brace’s performance, perform everyday tasks while paying close attention to any discomfort or restrictions. Document how the brace affects your mobility and comfort, and consult a healthcare provider if you notice persistent issues or limitations during your activities.
What should I track to monitor my recovery while using a wrist brace?
Track key indicators such as pain levels, swelling, range of motion, and skin condition. Maintain a detailed log to document any changes, and notify your healthcare provider if you experience worsening pain or new swelling during your recovery.
Recommended
- Best Practices for Wrist Rehabilitation After Injury – Austin Hand To Shoulder
- 7 Common Types of Wrist Injuries and How to Identify Them – Austin Hand To Shoulder
- Signs You Need Wrist Surgery: Complete Guide – Austin Hand To Shoulder
- Wrist Pain Self-Care Guide for Fast Relief at Home – Austin Hand To Shoulder


